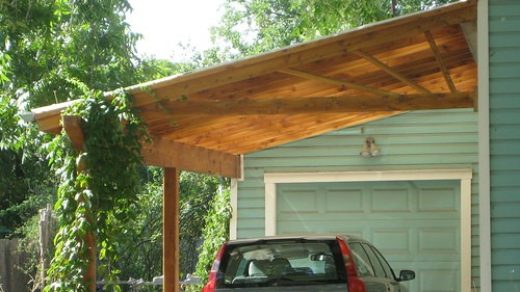
Benefits of Using a Carport DIY Kit
A carport DIY kit offers a convenient and cost-effective solution for protecting your vehicle from the elements. By assembling your own carport, you can customize the design to fit your space and style while enjoying the satisfaction of a completed project. These kits are designed to be user-friendly, making it easy for homeowners to create a durable, functional shelter without the need for professional installation.
Cost-Effective Solution
Using a carport DIY kit offers a cost-effective solution for protecting your vehicle and enhancing your property. These kits are generally more affordable than custom-built structures, allowing homeowners to save money while still achieving a durable and practical carport. Additionally, DIY kits provide the flexibility to customize the size and design to suit individual needs and space constraints.
Another benefit is the ease of installation, which can save on labor costs and time. Many kits come with clear instructions and all necessary components, empowering homeowners to build their carport without the need for professional help. This hands-on approach can also be a rewarding project that boosts your satisfaction and sense of accomplishment.
Furthermore, DIY kits are typically made from high-quality, weather-resistant materials that ensure longevity and low maintenance. They can be a great investment, providing long-term protection for your vehicle against harsh weather conditions such as snow, rain, and UV rays, while also adding value to your property.
Customized Design Options
Using a carport DIY kit offers numerous advantages, especially when it comes to customization and ease of installation. These kits are designed to provide a cost-effective and flexible solution for protecting your vehicle while offering the opportunity to tailor the design to suit your specific needs and aesthetic preferences.
- Cost Savings: DIY kits are generally more affordable than hiring professional contractors, allowing you to save money on construction costs.
- Customization Options: Many kits come with flexible design features, enabling you to choose materials, colors, and layout to match your property’s style.
- Ease of Installation: Designed for DIY enthusiasts, these kits often include comprehensive instructions and components that make the assembly process straightforward.
- Time Efficiency: Compared to building a carport from scratch, a DIY kit significantly reduces the construction time.
- Personal Satisfaction: Building your own carport can be a rewarding experience, giving you a sense of accomplishment.
- Adaptability for Future Modifications: Custom design options allow for easy upgrades or modifications as your needs evolve.
Ease of Installation
Using a carport DIY kit offers numerous benefits, especially when it comes to ease of installation. These kits are designed for simplicity, allowing homeowners to set up their own shelter without the need for professional help. The pre-cut materials and detailed instructions make the assembly process straightforward, saving time and reducing stress.
One key advantage is that DIY kits eliminate the need for specialized tools or skills, making the installation accessible to most people. The modular components typically fit together easily, helping you build a sturdy and secure carport efficiently. Additionally, many kits come with clear step-by-step guidance, ensuring even first-time builders can complete the project successfully.
Overall, a carport DIY kit provides a practical, cost-effective solution that simplifies installation while offering the satisfaction of creating a personalized and functional space. This ease of setup encourages more homeowners to enhance their property with a reliable, custom-built carport.
Increased Property Value
Using a carport DIY kit offers several advantages, one of which is the potential to increase your property’s value. A well-constructed carport enhances the overall curb appeal, making your home more attractive to prospective buyers. It provides a reliable and sheltered parking solution, showcasing thoughtful property improvements that can boost market value. Additionally, installing a carport DIY kit allows homeowners to customize the design to match their property’s style, further elevating its aesthetic appeal. By choosing a DIY kit, homeowners can also save money on installation costs while investing in a durable, long-lasting structure that adds both functionality and worth to their property.
Types of Carport DIY Kits
Carport DIY kits offer a practical and customizable solution for protecting your vehicle from the elements while adding value to your property. These kits come in various types, designed to suit different needs, styles, and skill levels, making it easier for homeowners to build their own carport without extensive construction experience. By understanding the different types of carport DIY kits available, you can choose the best option to fit your space, budget, and aesthetic preferences.
Metal Frame Kits
Metal frame carport DIY kits are a popular choice for those seeking a durable and affordable shelter for their vehicles. These kits generally feature pre-engineered metal components such as steel or aluminum, which can be easily assembled with basic tools. They offer excellent strength, resistance to harsh weather conditions, and long-term durability. Metal frame kits come in various styles, including freestanding units and attachments to existing structures, making them versatile for different property needs.
Wood Frame Kits
Wood frame carport DIY kits are popular choices for those looking to add a versatile and customizable shelter to their property. These kits typically include pre-cut wooden components that can be easily assembled with basic tools, making them ideal for DIY enthusiasts. Wood frame kits offer a natural aesthetic that blends well with various home styles and can be stained or painted to match existing structures. They are often more affordable and lightweight compared to metal options, allowing for easier transportation and installation. Additionally, wood provides excellent insulation and can be expanded or modified in the future if needed, making it a flexible option for a DIY carport project.
Resin or Polycarbonate Kits
When choosing a carport DIY kit, one of the key considerations is the type of material used, with resin and polycarbonate kits being two popular options. Resin kits are known for their durability, lightweight construction, and resistance to weather elements, making them an excellent choice for long-lasting shelter solutions. They often feature a sturdy frame with a resin-based roof that can withstand harsh conditions and require minimal maintenance.
On the other hand, polycarbonate kits are favored for their high impact resistance, transparency, and UV protection. These kits typically include panels made from thick polycarbonate sheets that allow natural light to pass through while providing excellent protection against UV rays and rain. Polycarbonate carport kits are ideal for those looking to combine functionality with a bright, airy appearance, often offering easy installation and customization options.
Ultimately, the choice between resin and polycarbonate DIY kits depends on your specific needs, climate, and aesthetic preferences. Both options provide practical and cost-effective solutions for creating a protective space for your vehicle without the need for professional installation.
Freestanding vs. Attached Kits
When considering a carport DIY kit, it is important to understand the different types available to find the best fit for your needs. The primary categories are freestanding and attached kits, each offering unique advantages and applications.
Freestanding carport DIY kits are standalone structures that are not connected to your home or other buildings. They offer flexibility in placement and design, making them ideal for driveways or spaces where attaching to a building is not feasible. These kits are generally easier to install and can be customized to suit various locations and aesthetic preferences.
Attached carport DIY kits, on the other hand, are designed to be integrated directly with your existing structure, such as a house or garage. They provide a seamless extension, offering additional protection for your vehicle while maximizing space efficiency. Installing an attached kit may involve more complex work, but it often results in a more cohesive appearance and improved stability.
Components Included in a DIY Carport Kit
A DIY carport kit offers a convenient and cost-effective solution for creating a functional shelter for your vehicle. These kits come with a variety of essential components designed for easy assembly, allowing homeowners to build their own carport with minimal hassle. Understanding the components included can help ensure you have everything needed for a successful installation and a durable, weather-resistant structure.
Framework or Frame
The framework or frame is a crucial component of a DIY carport kit, providing the structural foundation that supports the roof and ensures stability. Typically made from durable materials such as steel, aluminum, or treated wood, the framework is designed to withstand weather elements and provide long-term durability. The kit usually includes pre-cut beams, posts, and supports that are easy to assemble with the provided hardware. A well-constructed frame not only offers safety and security for your vehicle but also adds to the overall aesthetic appeal of the carport. When selecting a kit, ensure that the components are compatible and robust enough for your specific needs and local climate conditions.
Roofing Materials
When selecting a DIY carport kit, understanding the components included is essential to ensure a smooth installation process. Typically, these kits come with structural elements such as steel or aluminum frames, support beams, and pre-cut components for easy assembly. Additionally, hardware like bolts, screws, nuts, and connectors are provided to secure the structure properly. Many kits also include Foundation materials or instructions for creating a stable base, as well as side panels or curtains if applicable.
Roofing materials are a crucial aspect of a DIY carport kit, offering protection from weather elements. Common roofing options include polycarbonate panels, which are lightweight, durable, and UV-resistant, or metal sheets made from galvanized steel or aluminum that provide long-lasting coverage. Some kits might also offer asphalt shingles or fabric covers for more versatile or aesthetic choices. The selected roofing material should be compatible with the frame, weather-resistant, and easy to install, ensuring your carport remains sturdy and functional over time.
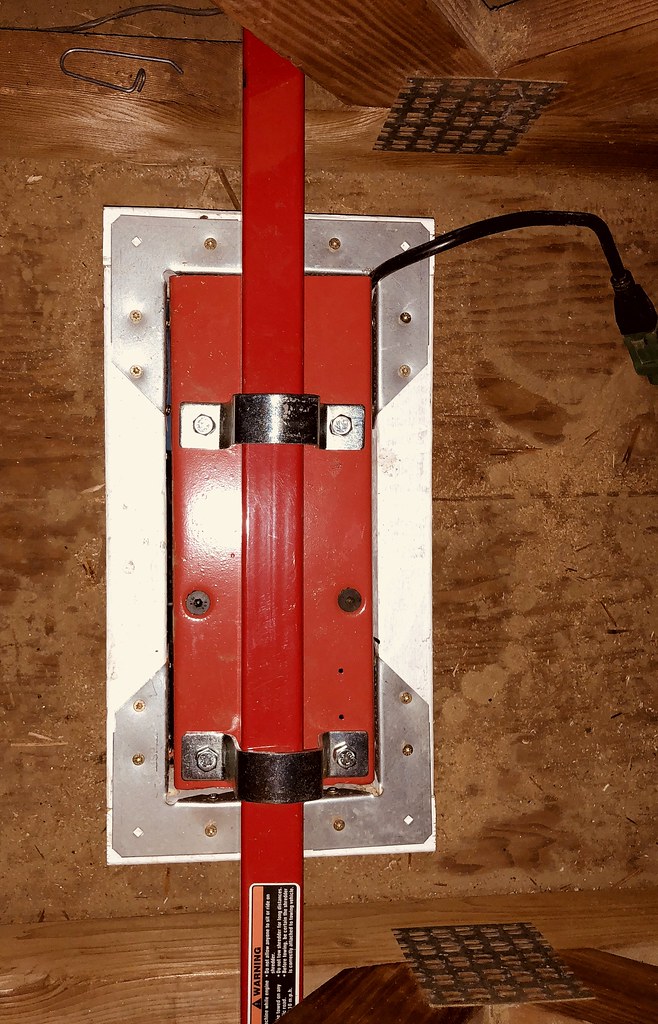
Hardware and Fasteners
A DIY carport kit typically includes all essential components required to assemble a sturdy and functional carport structure. These components often consist of posts, beams, rafters, and roofing panels, crafted from durable materials such as metal or wood to ensure longevity and stability. The kit is designed for ease of assembly, providing pre-cut or pre-drilled parts that simplify the construction process.
Hardware and fasteners are crucial elements of a DIY carport kit, ensuring that all parts are securely connected. Common hardware includes bolts, nuts, screws, washers, and brackets, which are made from weather-resistant materials to withstand outdoor conditions. These fasteners are selected to match the construction materials, offering strength and corrosion resistance. Additional hardware such as corner brackets, wall anchors, and sealants may also be included to enhance the durability and stability of the assembled carport. Proper use of these hardware components guarantees a safe and long-lasting structure that can withstand various environmental stresses.
Foundation Accessories
A DIY carport kit typically includes all the essential components needed to build a sturdy and functional shelter for your vehicle. These components often consist of pre-cut metal or wooden framing materials, panels or roofing sheets, and necessary fasteners such as screws, bolts, and nuts. Additionally, these kits may come with side panels or walls to provide extra protection and privacy. Foundation accessories are crucial for a stable installation and usually include concrete anchors, ground screws, or footplates that secure the structure to the ground. Some kits also feature optional elements like gutters, downspouts, and extra bracing to enhance durability and weather resistance.
Tools Needed for Assembly
When assembling a carport DIY kit, having the right tools on hand is essential for a smooth and efficient process. Proper tools ensure that components are correctly fitted and securely installed, helping you achieve a professional-looking result. In this guide, we will cover the basic tools you’ll need to successfully complete your carport project with ease and confidence.
Basic Hand Tools
When assembling a carport DIY kit, having the right basic hand tools is essential to ensure a smooth and efficient construction process. A hammer is needed for driving nails and adjusting parts, while a screwdriver set will help with tightening screws and bolts. An adjustable wrench allows for securing nuts and bolts of various sizes, and a tape measure ensures accurate measurements for proper fitting. A level is crucial for making sure the structure is aligned properly, and a power drill can speed up drilling holes and driving screws. Additionally, safety gear such as gloves and safety glasses should be included to protect during assembly. Having these basic hand tools on hand will make assembling your carport kit more manageable and ensure a professional-looking result.
Power Tools
When assembling a carport DIY kit, having the right tools is essential to ensure a smooth and efficient construction process. Power tools are particularly useful for cutting, drilling, and fastening materials quickly and accurately. A cordless drill with various drill bits is indispensable for driving screws and making holes. A circular saw or jigsaw can help cut timber or metal panels to the desired size. An impact driver is also helpful for securing bolts and heavy-duty fastenings. Additionally, a jigsaw or handsaw may be needed for detailed cuts. A level and measuring tape are necessary for precise alignment and measurements. Safety gear such as goggles and gloves should be used to protect oneself during assembly. Having these power tools on hand will facilitate faster assembly and a professional-looking result for your carport DIY kit.
Measuring and Leveling Instruments
When assembling a carport DIY kit, having the right tools is essential to ensure a smooth and accurate installation process. Measuring and leveling instruments help achieve precise alignment and secure fitment of all components. Essential tools include a tape measure for accurate measurements, a spirit level or bubble level to ensure surfaces and structures are perfectly horizontal or vertical, and a chalk line for marking straight guidelines. A carpenter’s square can be useful for right-angle checks, while a spirit level with a built-in ruler offers convenience. Additionally, a laser level can provide high-precision leveling over longer distances, making the assembly process more efficient. Having these measuring and leveling tools on hand will help create a stable and well-aligned carport structure that stands the test of time.
Safety Equipment
When assembling a carport DIY kit, having the right tools and safety equipment is essential to ensure a smooth and safe installation process. Basic tools such as a drill, screwdriver, wrench, and level are necessary for assembling the framework and securing parts efficiently. A measuring tape and utility knife can help in precise cutting and measurement. In addition, safety equipment like gloves, safety glasses, and a hard hat should be worn to protect against potential injuries during assembly. Making sure you have all the necessary tools and safety gear will help you complete your carport installation safely and effectively.
Step-by-Step DIY Carport Installation Guide
Setting up your own carport can be a rewarding and cost-effective project, especially with a DIY carport kit. This step-by-step guide will walk you through the process of installing a sturdy, functional carport that provides shelter and protection for your vehicle. Whether you’re a seasoned DIY enthusiast or a first-timer, you’ll find easy-to-follow instructions to help you achieve professional results.
Preparation and Site Selection
Preparing for a DIY carport installation begins with careful site selection to ensure stability and convenience. Choose a flat, level area with good drainage to prevent water accumulation and foundation issues. Make sure the spot has enough space for the size of the carport kit and easy access for construction. Clear the area of debris, plants, and obstructions to facilitate smooth assembly. Gather all necessary tools and materials, including the carport kit components, concrete, anchors, and safety equipment. Review the manufacturer instructions thoroughly to understand the steps involved, and consider marking the layout with stakes and string to outline the installation footprint. Proper preparation and site selection lay the foundation for a successful and durable DIY carport project.
Foundation Setup
Setting up the foundation for your DIY carport kit is a crucial step to ensure stability and durability. Begin by choosing a level, solid site that is free of debris and has good drainage. Mark the perimeter of your carport using stakes and string to outline the exact location. Excavate the area within the marked perimeter to remove loose soil and create a stable base. Then, install gravel or crushed stone to improve drainage and provide a firm foundation. Use a tamper to compact the gravel thoroughly, ensuring it is even and level. Next, pour concrete footings or slabs according to the dimensions specified in your kit instructions. Allow the concrete to cure fully before proceeding with the assembly of the structure. Proper foundation setup will provide a solid base for your carport, helping it withstand weather conditions and ensure long-term stability.
Assembling the Frame
Assembling the frame of your DIY carport kit is a crucial step to ensure a sturdy and reliable structure. Carefully following the manufacturer’s instructions will help you achieve the best results and safety standards.
- Begin by laying out all the frame components and hardware, checking against the instruction manual to ensure everything is included.
- Assemble the base frame on a level surface, starting with the side panels and connecting them using the provided bolts and brackets. Use a level to ensure accuracy.
- Attach the front and back beams to the side panels, securing them tightly to form the main perimeter of the carport.
- Install the vertical posts at designated points, ensuring they are plumb and evenly spaced. Secure each post firmly to the base framework with appropriate fasteners.
- Connect the horizontal support beams across the top of the vertical posts, creating the roof frame. Double-check all connections for stability.
- Clamp or temporarily brace the assembled frame to maintain its shape as you proceed with further instructions or preparation for roofing.
- Inspect the entire frame for any loose bolts or misalignments, tightening all connections as necessary to guarantee a solid structure.
Installing the Roofing
Installing the roofing on your DIY carport kit is a crucial step to ensure durability and protection for your vehicle. Proper installation not only enhances the appearance of your carport but also maximizes its lifespan. Follow this step-by-step guide to efficiently install the roofing panels on your DIY carport project.
- Prepare the Roofing Materials
- Gather all roofing panels, screws, washers, and tools required for installation.
- Ensure that your roofing panels are free of damage and match the dimensions of your carport frame.
- Install the First Row of Roofing Panels
- Start at one end of the roof, positioning the first panel with the overhang facing the edge of the carport.
- Align the panel so it is level and flush with the edge of the frame.
- Screw the panel into place using appropriate fasteners, placing screws along the edges and at designated intervals.
- Lay Down Subsequent Panels
- Overlay the next panel onto the first, ensuring the side laps are aligned correctly as per manufacturer instructions.
- Screw through the overlapping areas into the underlying panel to secure each panel firmly.
- Repeat the process across the length of the roof.
- Ensure Proper Overlap and Sealing
- Maintain the recommended overlap distance to prevent leaks, usually specified by the panel manufacturer.
- Use sealant if recommended, especially in the overlaps or at joints, to enhance weatherproofing.
- Finish the Edges and Check Alignment
- Trim excess panels or edges if necessary for a clean finish.
- Verify that all panels are securely fastened and properly aligned to avoid gaps or warping.
- Inspect the Roofing Installation
- Check that all screws are tight and there are no loose panels.
- Inspect for water drainage pathways and ensure the roof pitch facilitates runoff.
With careful attention to detail and following these steps, you can successfully install the roofing on your DIY carport kit, providing a sturdy and weather-resistant shelter for your vehicle.
Final Inspection and Adjustments
After completing the installation of your DIY carport kit, it is essential to perform a thorough final inspection and make any necessary adjustments to ensure safety and durability. Begin by checking all structural components, including posts, beams, and roof panels, for secure connections and proper alignment. Verify that the carport is level and stable by using a level and inspecting the foundation and support feet. Look for any loose bolts, screws, or fasteners and tighten them as needed. Examine the roof for proper attachment, ensuring there are no gaps, loose panels, or potential leaks. Confirm that all weatherproofing elements, such as sealants or flashing, are properly installed. Additionally, assess the overall stability by gently applying pressure to different parts of the structure to identify any wobbling or movement. Make adjustments where necessary to reinforce weak points or re-align components. Finally, clear the area of any debris or tools used during installation and review safety guidelines to ensure your carport is ready for use. Regular maintenance checks will help preserve the integrity of your DIY carport over time.
Tips for Successful DIY Carport Project
Embarking on a DIY carport project can be a rewarding way to enhance your property’s functionality and curb appeal. Using a carport DIY kit simplifies the process, providing pre-measured materials and clear instructions. With proper planning and some basic tools, you can create a sturdy, attractive shelter for your vehicle while saving money. Here are essential tips to ensure your DIY carport project runs smoothly and results in a long-lasting structure.
Follow the Manufacturer’s Instructions Carefully
To ensure a successful DIY carport project using a kit, it is crucial to follow the manufacturer’s instructions carefully. Proper adherence to these guidelines will help you assemble the structure correctly, ensuring safety, durability, and a polished finish.
- Read all instructions thoroughly before starting the project to understand each step and gather all necessary tools and materials.
- Organize all components and hardware to streamline the assembly process and avoid confusion.
- Follow the recommended measurements and layout provided in the manual precisely to ensure the structure fits correctly and is stable.
- Pay close attention to safety warnings and handling instructions to prevent accidents during assembly.
- Use the specified tools and techniques as outlined in the instructions to avoid damaging parts or compromising structural integrity.
- Check each step off the instruction manual as you complete it, ensuring no details are overlooked.
- If you encounter ambiguities or difficulties, consult the manufacturer’s support resources or contact customer service for guidance.
- Allow for proper curing and setting times as recommended before exposing the carport to heavy loads or severe weather conditions.
Obtain Necessary Permits
Obtaining necessary permits is a crucial step in ensuring your DIY carport kit project is successful and compliant with local regulations. Before beginning construction, check with your city or county building department to understand the permit requirements specific to your area. This may include submitting project plans, paying fees, and adhering to zoning codes. Securing the proper permits not only helps avoid potential fines or legal issues but also ensures your carport is safe and built to standard. Keep all documentation organized and retain copies of permits for future reference. Working with local authorities early in the process can streamline construction and provide peace of mind as you assemble your DIY carport kit.
Consider Weather Conditions During Installation
Considering weather conditions during installation is crucial for the success of your DIY carport project. Avoid planning your installation during rainy or extremely windy days, as wet surfaces can cause slipping and unstable workmanship. Clear, dry weather ensures that materials such as concrete and paint cure properly and that structural components can be assembled safely. Additionally, strong winds can pose safety hazards and affect the precision of your construction. Watching for forecast updates and choosing a period of stable weather will help you complete your DIY carport kit efficiently and safely, resulting in a durable, long-lasting structure.
Seek Assistance When Needed
When undertaking a DIY carport project with a carport kit, seeking assistance when needed can ensure safety and accuracy. Don’t hesitate to ask for help from friends, family, or professionals if you encounter complex steps or heavy components. Their support can make lifting, aligning, and securing parts easier and safer, reducing the risk of mistakes or injuries. Additionally, consulting expert advice or reading detailed instructions can prevent common errors and improve the overall quality of your build. Remember, teamwork and expert guidance can turn a challenging project into a rewarding achievement.
Maintenance and Durability of DIY Carports
Building a DIY carport kit is an excellent way to create a functional and cost-effective shelter for your vehicle. However, ensuring the maintenance and durability of your carport is essential to maximize its lifespan and performance. Proper upkeep and quality materials can help your DIY carport withstand various weather conditions and remain a reliable asset for years to come.
Regular Cleaning
Maintaining and ensuring the durability of a DIY carport kit is essential for prolonged functionality and appearance. Regular inspections help identify any signs of wear or damage early, allowing for timely repairs. It is important to tighten loose bolts and screws and check for rust or corrosion, especially on metal components. Applying protective coatings or paint can prevent corrosion and maintain the carport’s structural integrity. Additionally, ensuring proper drainage around the base helps prevent water accumulation that can weaken the foundation over time.
Regular cleaning of the carport is crucial to preserve its appearance and prevent material deterioration. Using a gentle soap solution and water, remove dirt, debris, and bird droppings that may cause staining or corrosion. For metal parts, a soft brush or cloth helps avoid scratches. If necessary, a pressure washer on a low setting can be used carefully to clean larger surfaces. Periodic cleaning combined with routine maintenance enhances the lifespan of your DIY carport kit, making it a reliable shelter for your vehicle season after season.
Inspecting for Damage
Maintaining and ensuring the durability of your DIY carport kit is essential for its longevity and continued functionality. Regular inspections help identify any signs of wear or damage early, preventing more costly repairs in the future. Check for rust, corrosion, or wood rot in the frame and supports, especially after harsh weather conditions. Tighten loose bolts or screws and replace any damaged components promptly. Protect metal parts with appropriate sealants or paint to prevent rust, and apply weatherproof coatings to wooden sections to resist moisture. Proper maintenance not only extends the life of your carport but also ensures it remains a safe and reliable shelter for your vehicle.
Protective Treatments and Coatings
When choosing a DIY carport kit, maintenance and durability are essential factors to ensure long-term performance and protection. Proper upkeep and protective treatments can significantly extend the lifespan of your carport while maintaining its appearance and structural integrity.
Regular maintenance involves inspecting the structure for signs of wear, such as rust, corrosion, or wood rot, and addressing issues promptly. Cleaning the surfaces to remove dirt, debris, and organic growth can prevent deterioration and keep the carport looking new. Applying protective treatments and coatings enhances durability by providing a barrier against environmental elements like rain, snow, sunlight, and pollution.
- Use weather-resistant paint or sealants specifically designed for outdoor structures.
- Apply rust inhibitors to metal components to prevent corrosion.
- Treat wooden parts with preservatives or water-repellent finishes to resist moisture damage.
- Conduct annual inspections to identify and repair any damage or wear.
- Cover or store components during harsh weather conditions to minimize exposure.
Investing in high-quality protective coatings during installation can significantly enhance the durability of your DIY carport kit. Additionally, choosing materials with inherent weather resistance and following manufacturer guidelines for maintenance will ensure your carport remains sturdy and reliable for years to come.
Replacing Worn or Damaged Parts
Maintaining and ensuring the durability of a DIY carport kit is essential for long-term protection and performance. Regular inspections help identify worn or damaged parts early, preventing further deterioration and potential safety hazards. When replacing parts, it is important to use compatible components that match the original specifications to preserve the structural integrity of the carport.
Worn or damaged elements such as roofing panels, support posts, or fasteners should be carefully removed and replaced with quality materials to withstand weather conditions and daily use. Proper installation of replacement parts ensures that the carport remains stable and secure over time. Additionally, applying protective coatings or sealants can extend the lifespan of metal components, preventing rust and corrosion. Consistent maintenance not only enhances durability but also maximizes the investment in your DIY carport kit, providing reliable shelter for years to come.